::About::
This is Vijay Kumar's personal blog. Here you will find his explorations into GNU/Linux, Art, Embedded Systems, ...
vijaykumar
AT
bravegnu DOT org
::Archives::
::Tags::
8051
arm
ascii-art
blosxom
chennaipy
design-pattern
doc
embedded
erpnext
foss
git
gtk
java
ldap
linux
linux-kernel
pyconindia
python
qemu
svn
thinkpad
vector-art
wikipedia
zigbee
::Top Stories::
::Promos::
![[FSF Associate Member]](http://static.fsf.org/nosvn/associate/fsf-11643.png)

~vijaykumar
[ Home | Feed | Twitter | Vector Art | Ascii Art | Tutorials ]
Python Byte Code Hacks
Mon, 11 Jul 2016
The objective of this article is to help people understand how the Python VM works, through a poke and learn approach.
Disclaimer
Python’s byte code is specific to the CPython implementation. Moreover it is not guaranteed to be stable across CPython versions. And hence it is a bad idea to do such things in production code. The examples provided in this article are for demonstration and learning purposes only.
Compilers & Interpreters
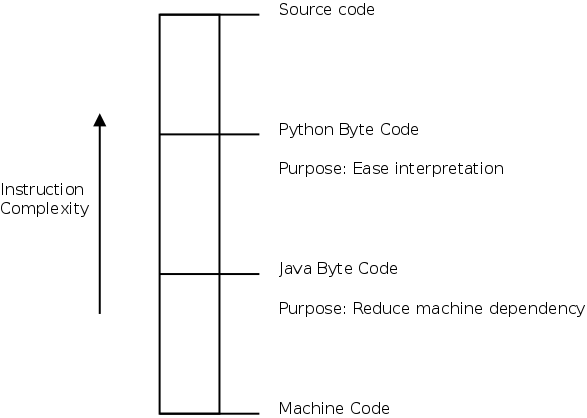
With C programs, the compiler converts C source to machine instructions. In languages like BASIC, the programs were interpreted line by line. In some language implementations, like Python and Java, the source code is compiled to a intermediate language, resulting in byte codes which is then executed by an interpreter. In Java, the source code is compiled to byte code to reduce machine dependency, increasing portability. In Python, the source code is compiled to byte code to reduce parsing overhead and ease interpretation.
The following diagram, shows the various representations of programs, and the complexity of instructions, in each representation.
The software that executes the byte code is called the abstract virtual machine. These virtual machines are modelled after microprocessors. And hence to understand how these virtual machines work, it would be a good idea to start by reviewing how microprocessors work.
Microprocessor Model
From a functional standpoint, a microprocessor is a device that reads data from memory, processes it and writes back data to memory, based on instructions. The instructions specify which memory location to read data from, what operation to perform and which memory location to write the result to.
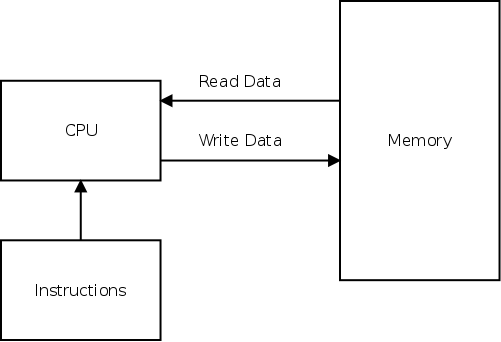
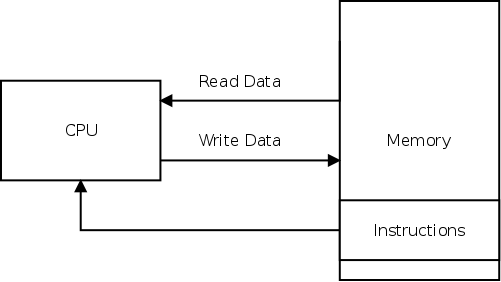
The above microprocessor model can be improved further: the instructions are themselves stored in memory. Now the operation of a microprocessor can be re-stated as - "a microprocessor is a device that reads data from memory, processes it and writes back data to memory, based on instructions, which are themselves stored / fetched from memory."
Python Interpreter Model
The Python interpreter as mentioned before is modelled after microprocessors. Data in Python is represented as objects stored in the heap. The Python interpreter works by manipulating these objects in memory, based on instructions. The instructions specify what type of objects to create, which objects to delete, the attribute of an object to be read / modified.
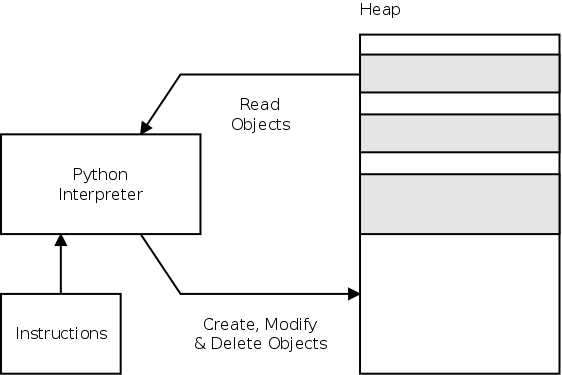
The model can be further improved, by taking into consideration the fact that the byte code instructions are themselves wrapped in "code objects" and are also stored in the heap.
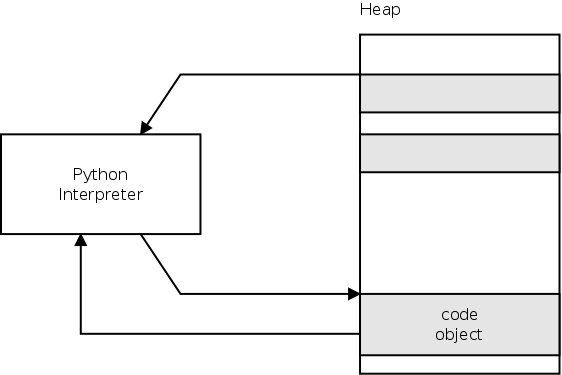
So the Python compiler, parses functions / modules, compiles them and creates code objects, which are then executed by the Python interpreter.
Stack Machines
The byte code interpreters are generally implemented in one of the two ways, depending on how the operands are accessed and results are stored, by instructions:
-
Register Machines
-
Stack Machines
Register machines are more like traditional microprocessors. Instructions operate on register operands and store results in registers. Stack machines are best understood through an example. The following set of instructions, for a hypothetical stack machine, adds to immediate values.
loadi 1
loadi 2
add
loadi 4
add
The following diagram steps through each instruction, and shows how the stack is affected by the instruction.
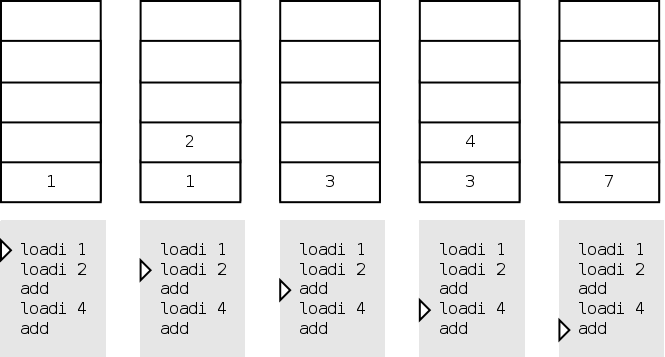
Step 1: loadi 1
The immediate value 1 is stored into the stack.
Step 2: loadi 2
The immediate value 2 is stored into the stack.
Step 3: add
The top two values, 1 and 2 are popped from the stack, added and the result 3 is pushed on to the stack.
Step 4: loadi 4
The immediate value 4 is stored into the stack.
Step 5: add
The top two values, 3 and 4 are popped from the stack, added and the result 7 is pushed on to the stack.
Python’s Stack Machine
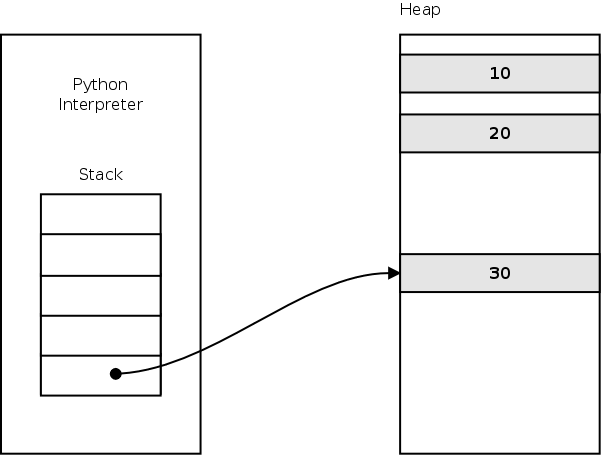
Now, Python’s stack machine is a little bit more complicated that the hypothetical stack machine that we saw in the previous section. In Python, the objects are always stored in the heap. It’s only the pointer to the object that is stored in the stack. Let’s consider two integer objects in the heap. The stack now has pointers to the two objects. The following pointer diagram, shows how exactly the objects are organized in memory.

Python’s interpreter has an instruction called BINARY_ADD that pops off the top two objects 10 and 20. Adds them which results in a new object 30 on the heap. It then pushes the pointer to the object on to the stack. The state of the stack after the execution of the BINARY_ADD instruction is shown in the following diagram.
Let’s Get Started
Now, that we have a basic idea of how Python’s interpreter works, let’s try poking around Python’s compiler and interpreter. We will use the following code for this purpose.
def myfunc():
    return 6 / 2

print myfunc()
The function just divides two constants and returns the value back to the caller. Now let’s try to print the code object generated for this function. The code object is accessible from myfunc.__code__.
def myfunc():
    return 6 / 2

co = myfunc.__code__
print "co_consts:", co.co_consts
print "co_code:", repr(co.co_code)
The code generates the following output.
co_consts: (None, 6, 2)
co_code: 'd\x01\x00d\x02\x00\x15S'
The attribute co_consts, contains a tuple of constants used by the function. The co_code, contains the byte code instructions, generated by compiling the function. This just shows that there is a code object associated with every function, that contains the byte code instructions and associated data to execute the function. To understand this better let us try to decode the byte code string.
Deciphering the Byte Code
When represented as a string, the byte code instructions does not make much sense. Let’s try printing it in hex.
def myfunc():
    return 6 / 2

co = myfunc.__code__

print "co_consts:", co.co_consts
print "co_code:"

for i, ch in enumerate(co.co_code):
    print "    %d: %02X" % (i, ord(ch))
The code generates the following output.
co_consts: (None, 6, 2)
co_code:
    0: 64
    1: 01
    2: 00
    3: 64
    4: 02
    5: 00
    6: 15
    7: 53
The first byte code instruction 0x64. How do we determine what that actually means? The Python interpreter has a module called dis, which has a mapping for byte code instructions from opcodes to mnemonics.
>>> import dis
>>> print dis.opname[0x64]
LOAD_CONST
The first instruction in the byte code string, is LOAD_CONST. The instruction is followed by 2 byte integer operand. The operand is an index into the co_const tuple, that specifies the constant to be pushed / loaded into the stack. The operand specified in this case is 0x0001, which corresponds to the constant 6. The instruction can thus be represented in mnemonics as.
LOAD_CONST 1
The first instruction and its operand is followed by the second instruction, 0x64. Which again corresponds to LOAD_CONST. This time the operand is the index 0x0002, which corresponds to the constant 2.
The next instruction is 0x15, which decodes to BINARY_DIVIDE, as shown below.
>>> print dis.opname[0x15]
BINARY_DIVIDE
The instruction does not require any operands. The instruction pops the top two values from the stack, and performs a divide and pushes the result back on to the stack.
The next instruction is 0x53, which decodes to RETURN_VALUE. The RETURN_VALUE instruction takes the top of the stack and returns the value back to the caller.
The complete dis-assembled version of the byte code string is.
64    LOAD_CONST 1
01
00
64    LOAD_CONST 2
02
00
15    BINARY_DIVIDE
53    RETURN_VALUE
Writing a Dis-assembler
In the previous section, we dis-assembled the code, manually. Let’s write a dis-assembler that can do this for us. It can be easily achieved by running the byte code string through a loop and then printing the opname of the each byte code instruction. The only catch is that some of them take an operand. Given the byte code instruction’s integer representation, the code to determine if the instruction takes an operand is shown below.
if op > dis.HAVE_ARGUMENT:
   print "opcode has an operand."
else:
   print "opcode does not have an operand."
The code that implements the dis-assembler using the above mentioned technique is shown below.
import dis

def myfunc():
    return 6 / 2

co = myfunc.__code__

code = co.co_code
state = "opcode"

for op in code:
    op = ord(op)

    if state == "opcode":
        print "%02X" % op, dis.opname[op]
        if op > dis.HAVE_ARGUMENT:
            state = "arg1"

    elif state == "arg1":
        print "%02X" % op
        state = "arg2"

    elif state == "arg2":
        print "%02X" % op
        state = "opcode"
And the output is shown below.
64 LOAD_CONST
01
00
64 LOAD_CONST
02
00
15 BINARY_DIVIDE
53 RETURN_VALUE
In fact, the dis module has a disassemble() function, which exactly does this, given a code object.
>>> help(dis.disassemble)
Help on function disassemble in module dis:

disassemble(co, lasti=-1)
    Disassemble a code object.
Hacking Code Objects
Now that we have some idea of code objects, let’s try playing around with them. What if we modify the constants so that the tuple is (None, 10, 2) instead of (None, 6, 2), will that result in the program printing 5? Let’s find out.
One thing we need to know about code objects is that they are immutable. So we will need to create a new code object with the new value for co_consts attribute.
The code that creates a new code object and injects that back into the function object is shown below.
import dis
import new

def myfunc():
    return 6 / 2

# Hacking the code object

co = myfunc.__code__
myconsts = (None, 10, 2)

co2 = new.code(co.co_argcount,
               co.co_nlocals,
               co.co_stacksize,
               co.co_flags,
               co.co_code,
               myconsts,
               co.co_names,
               co.co_varnames,
               co.co_filename,
               co.co_name,
               co.co_firstlineno,
               co.co_lnotab)

# Injecting the modified code object

myfunc.__code__ = co2

print myfunc()
The new module has the constructor to create the code object. The constructor takes a huge list of arguments, and we specify all of them from the old code object, except for the co_consts, for which we specify our new set of constants. The output of the code is shown below.
5
This does in fact modify the behaviour of the function / code object! We have successfully completed our first hack!
Hacking the Byte Code String
Now let’s get a little bolder, and try to modify the byte code string instead. We will replace the BINARY_DIVIDE instruction with the BINARY_ADD instruction. The BINARY_ADD corresponds to opcode 0x17. The BINARY_DIVIDE appears at offset 6 is the byte code string. The following snippet can be used to unpack, modify and repack the byte code string.
bcode = co.co_code
bcode = list(bcode)
bcode[6] = "\x17"
bcode = "".join(bcode)
The following code builds upon this idea attempts to hack the byte code string.
import dis

def myfunc():
    return 6 / 2

# Hacking the code object

co = myfunc.__code__

bcode = co.co_code
bcode = list(bcode)
bcode[6] = "\x17"
bcode = "".join(bcode)

import new

co2 = new.code(co.co_argcount,
               co.co_nlocals,
               co.co_stacksize,
               co.co_flags,
               bcode,
               co.co_consts,
               co.co_names,
               co.co_varnames,
               co.co_filename,
               co.co_name,
               co.co_firstlineno,
               co.co_lnotab)

# Injecting the modified code object

myfunc.__code__ = co2

print myfunc()
Now, when we run the code we get the following output, which is 6 + 2 instead of 6 / 2!
8
Look Ma, No Hands!
Now let’s take this to a whole new level, by creating the code object for a function, without actually writing the Python function. The function that we are going to write is the classic "Hello World". The byte code instructions and the constants tuple for implementing this is shown below.
Consts: (None, "Hello Byte Code World!")
Byte Code Instructions:
    LOAD_CONST 1
    PRINT_ITEM
    PRINT_NEWLINE
    LOAD_CONST 0
    RETURN_VALUE
The PRINT_ITEM pops object from the top of the stack and prints it. The PRINT_NEWLINE, prints an newline character. The code returns None, to the caller. This is because every function in Python has to return something, if there is nothing to return, it returns None.
The code to create the code object and the function object is shown below.
import new

myconsts = (None, "Hello Byte Code World!")
mycode = ("\x64"   # LOAD_CONST
          "\x01"   # 0x0001
          "\x00"   #
          "\x47"   # PRINT_ITEM
          "\x48"   # PRINT_NEWLINE
          "\x64"   # LOAD_CONST
          "\x00"   # 0x0000
          "\x00"   #
          "\x53")   # RETURN_VALUE

# Create the code object
co = new.code(0,         # co_argcount,
              0,         # co_nlocals,
              1,         # co_stacksize,
              0,         # co_flags,
              mycode,    # co_code,
              myconsts,  # co_consts,
              (),        # co_names
              (),        # co_varnames
              "test.py", # co_filename,
              "myfunc",  # co_name,
              0,         # co_firstlineno,
              "")        # co_lnotab)

# Create the function object
myfunc = new.function(co, {})

# Invoke the function
myfunc()
We provide sane values for all other arguments to the code object constructor. The function object constructor is also available from the new module. Here’s the output of the program.
Hello Byte Code World!
That indeed, did create a working Python function! The arguments to the code object constructor deserve a little more explanation.
- co_argcount
-
An integer, that specifies the number of positional arguments, the function accepts. In our case, it is 0.
- co_nlocals
-
An integer, that specifies the number of local variables, including positional arguments, used by the function. In our case, it is again 0.
- co_stacksize
-
An integer, that specifies, the stack depth utilized by the code object. In our case, at any given point, we do not store more than 1 element in the stack.
- co_flags
-
An integer, with bits indicating things like whether the function accepts variable number of arguments, whether the function is a generator, etc.
- co_varnames
-
A tuple, containing the names of positional arguments and local variables. In our case, it is an empty tuple.
- co_names
-
A tuple, containing names of identifiers other than local variables. In our case, it is an empty tuple.
- co_filename
-
A string, specifying the file in which the function was present. In our case, we just use a dummy filename test.py.
- co_name
-
A string, specifying the name of the function.
- co_firstlineno
-
An integer, specifying the first line number of the function within the file.
- co_lnotab
-
An string, that encodes the mapping of byte code offset to line numbers. Used while printing tracebacks. In our case, which just pass an empty string.
More Bytes of Code
We will now write a Python function, just as before, that will accept two arguments, add them and return the result, i.e the byte code equivalent of the following Python function.
def myfunc(a, b):
    return a + b
The code to create the code object and the function object is shown below.
import new

myvarnames = ("a", "b")
mycode = ("\x7C"   # LOAD_FAST
          "\x00"   # 0x0000
          "\x00"   #
          "\x7C"   # LOAD_FAST
          "\x01"   # 0x0001
          "\x00"   #
          "\x17"   # BINARY_ADD
          "\x53")   # RETURN_VALUE

co = new.code(2,         # co_argcount,
              2,         # co_nlocals,
              2,         # co_stacksize,
              0,         # co_flags,
              mycode,    # co_code,
              (),        # co_consts,
              (),        # co_names
              myvarnames,# co_varnames
              "test.py", # co_filename,
              "myfunc",  # co_name,
              0,         # co_firstlineno,
              "")        # co_lnotab


myfunc = new.function(co, {})

print "myfunc(10, 20) =>", myfunc(10, 20)
print 'myfunc("abc", "def") =>', myfunc("abc", "def")
Since we are trying to load arguments / local variables, we use the byte code instruction LOAD_FAST. The LOAD_FAST instruction loads the value of a local variable on to the stack. The instruction accepts an argument that specifies the local variable as an index into the co_varnames tuple.
The argument count co_argcount, is specified as 2. The no. of arguments and local variables co_nlocals, is specified as 2. The stack size is specified as 2, since we push a maximum of two items into the stack. The names of the positional arguments / local variables co_varnames, is specified as ("a", "b").
The output of the program is shown below.
myfunc(10, 20) => 30
myfunc("abc", "def") => abcdef
Python vs Java Byte Code Instructions
There are few more things to learn from the previous example. The BINARY_ADD instruction does not operate on integers, unlike the ADD instruction of a microprocessor. It operates on objects, provided they implement the __add__() or __radd__() magic methods. This is emphasized by the second function call, that invokes myfunc() with string arguments. This is what distinguishes Python’s byte codes from Java’s byte codes. Python’s byte codes are there to simplify interpretation, they are more closer to the source language. Java’s byte codes are there to reduce machine dependency, and as such they are more closer to the machine instructions.
Conclusion
Hope this exercised has helped people understand how Python’s VM works. Well, this is not useful for writing production code, but at-least it is a fun way to learn how interpreters are implemented.
Permalink | Add Comment | Share: Twitter, Facebook, Buzz, ... | Tags: python
blog comments powered by Disqus
![]() |
|
![]() |
|
![]() |
|
![]() |
|
![]() |
|
![]()